Tag Archives: do it yourself

SIMPLE BODY SCRUB DIY

SIMPLE BODY SCRUB DIY

SIMPLE BODY SCRUB DIY

Today I wanna share a very simple body scrub DIY with all of you. Something that is done super easy and can be changed in many ways. Now lets see what you need inorder to make these body scrubs. I made two different scrubs, one with coffee and one with lemons and oranges.
things you need
coffee
salt
sea salt
coconut oil
lemons
oranges
grater
mason jars

SIMPLE BODY SCRUB DIY

step one:
In this DIY I show you how I made the coffee body scrub. Take some coffee grounds and mix it with 2 tabelspoons of coconut oil. In case your coffee grounds is still warm then you dont have to heat the coconut oil, if not I would suggest to heat it up a bit.

SIMPLE BODY SCRUB DIY

step two:
Add three tablespoons of normal table salt and six tablespoon of sea salt. Mix everything. And that was it. Super easy and simple. It only takes three steps and it is a great way to recycle coffee grounds.
How to make the orange and lemon body scrub:
For the lemon and orange body scrub you start with the normal and sea salt. Then you grate the peel of a lemon and orange. Squeeze the juice of the lemon and orange and mix it with the salt. Then add the coconut oil and mix everything. Again, thats all I did for this second scrub.
SIMPLE BODY SCRUB DIY
I use the scrubs two to three times a week after washing my body. The most amazing thing about these scrubs is, that you dont have to use any body lotion. The coconut oil totally does that job. The scrubs leave your skin super soft and especially in winter our skin can need some extra pampering.
I made these scrubs so many times and I love how simple it is. There are many ways to change them. Instead of coconut oil one could add massage oils or any other scented oils. Or you could add some fresh vanilla to the coffee scrub in order to make it a tad sweeter. The best parts about these scrubs are that you dont end up with any plastic trash and you save lots of money. Coconut oil, salt, lemons and oranges are quiet affordable and easy to find. So I would love to hear from you. Did you make any scrubs? If so, what did you use?
FacebooktwittermailFacebooktwittermail
how to make a solid tray

HOW TO MAKE A SOLID TRAY

how to make a solid tray

  • 1 VIKTIGT tray (found via IKEA)
  • 2 ROPE
  • 3 TAPE
  • 4 DRILLING MACHINE
  • 5 SCISSORS
  • 5 SAND PAPER (optional)
another simple DIY that I have made with another cool piece that I have found at IKEA. I love to use things a bit differently, and thats why we use a cutting/chopping board for a tray today.
I am sure that some of you, including me, love to hang out on the couch and drink tea or whatever. my problem is always where to put my cup of tea so that it is close to me but on a solid spot. thats how I got the idea to make something solid, the perfect solid tray.

how to make a solid tray

step one
start by drilling four holes, two on each side. I used a hole puncher to measure the distance between the holes. also make sure to not drill too close to the edge or the wood may break, and not too far into the center, as you want the holes to be on the cut side of the tray. another thing I did was to keep the plastic on the board to avoid scratches.

how to make a solid trayhow to make a solid tray

step two
use a piece of sand paper to smoothen the driled holes.

how to make a solid tray

step three
measure enough rope so you can put your hands around the handles and have enough to tie a knot. loop the rope thru the holes and tie knots at the ends.

how to make a solid tray how to make a solid trayhow to make a solid tray

thats it, very simple and easy, right? I had so much fun creating this DIY and I hope you all like the way it turned out. in case you did something similar or feel inspired to make your own tray please leave a comment below, I love hearing from you. X

how to make a solid tray

and now lets have a look how you can use our newly made DIY in action. my intention was to use it for drinking tea on the couch and be sure that the tea wont spill but now I saw how cute it can look as a simple presentation board. so as you can see the options to use are endless.

how to make a solid tray

how to make a solid tray

how to make a solid tray

that was it from today. I am looking forward to your comments and am sure that there will soon be another DIY feat. IKEA on the blog. stay tuned. X


FacebooktwittermailFacebooktwittermail
pimping the pots - DIY

PIMPING THE POTS – DIY

finally spring is here and this is the time to start decorating your balcony. like last year I also grow tomatoes this year and somehow I was not so satisfied with the regular plant pots that I have found. thats when I had the DIY idea to make my own pots, or lets say the idea for pimping the pots.pimping the pots - DIY

lets see what we are going to need for this PIMPING THE POTS DIY:
  • pots KALASA (I found them via IKEA, small 14.95 CHF / large 19.95)
  • rope (I found it at JUMBO)
  • scissors
  • clear tape
its very very simple and easy to find all of these things. and in case you dont like the white pots you can spray paint them before starting the pimping DIY. I love white and therefore I leave them the way they are.
step one:

pimping the pots - DIY

take your pot and ropes and place them on a table or floor. then I wrapped the rope twice around the pot and made sure to have enough rope left to tie the knot.

pimping the pots - DIY

step two:

pimping the pots - DIY
cut the rope with your scissors and seal the ends like in the photo above. this will prevent the rope from opening and will make the knot look a lot neater.
step three:
pimping the pots - DIY
tie a sailor knot like in the photo above. start with a normal knot and then do the opposite to the ends. this will create such a lovely result on your simple white pots, voila, thats it!

pimping the pots - DIY

I absolutely love the result of this pimping the pots DIY. I continued these steps and made four pots for the balcony. that was a very easy DO IT YOURSELF and I am curious to know if you like it, so please comment below and in case you are doing this too please share your photos with me via my social media channels. I always love to hear from you. X
final result:

pimping the pots - DIY pimping the pots - DIY pimping the pots - DIY


FacebooktwittermailFacebooktwittermail

DO IT YOURSELF advent calendar

today is december first and I am actually very late with showing you this post as all the advent calendars start today 🙂 anyway I felt the urge to share my idea with you – maybe for next year. who knows!
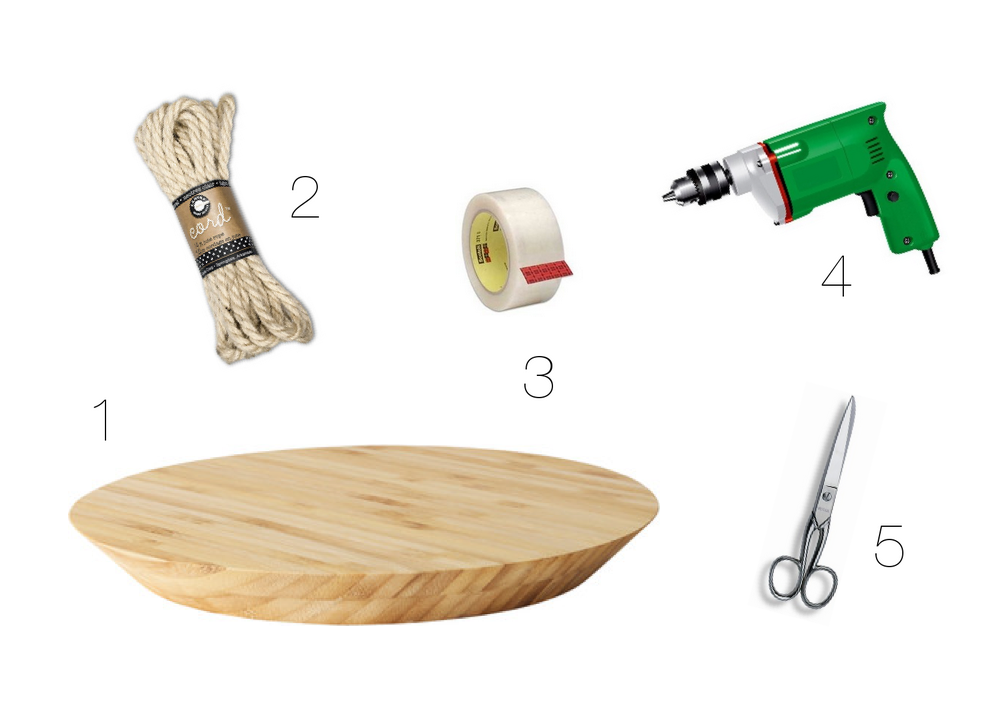
what do you need?

scissors
silver pen
black pen
white paper / one thicker paper for template
black envelopes and cards
black pegs (mini)
24 ideas*

*some ideas

you could write 24 reasons why you love someone – you could give 24 vouchers to someone – you could remember 24 events with someone and re-capture them – you could draw 24 nice things – as you see I could go on and on and on with ideas. and let me tell you – the advent season is not about spending lots of money it is about caring for others and sharing love. so I saw many nice DIY advent calendars that involved buying 24 items and I think you can also make someone happy with words and only spending a little. I found all my things at Manor in basel and I have spent 13 CHF 🙂

step one
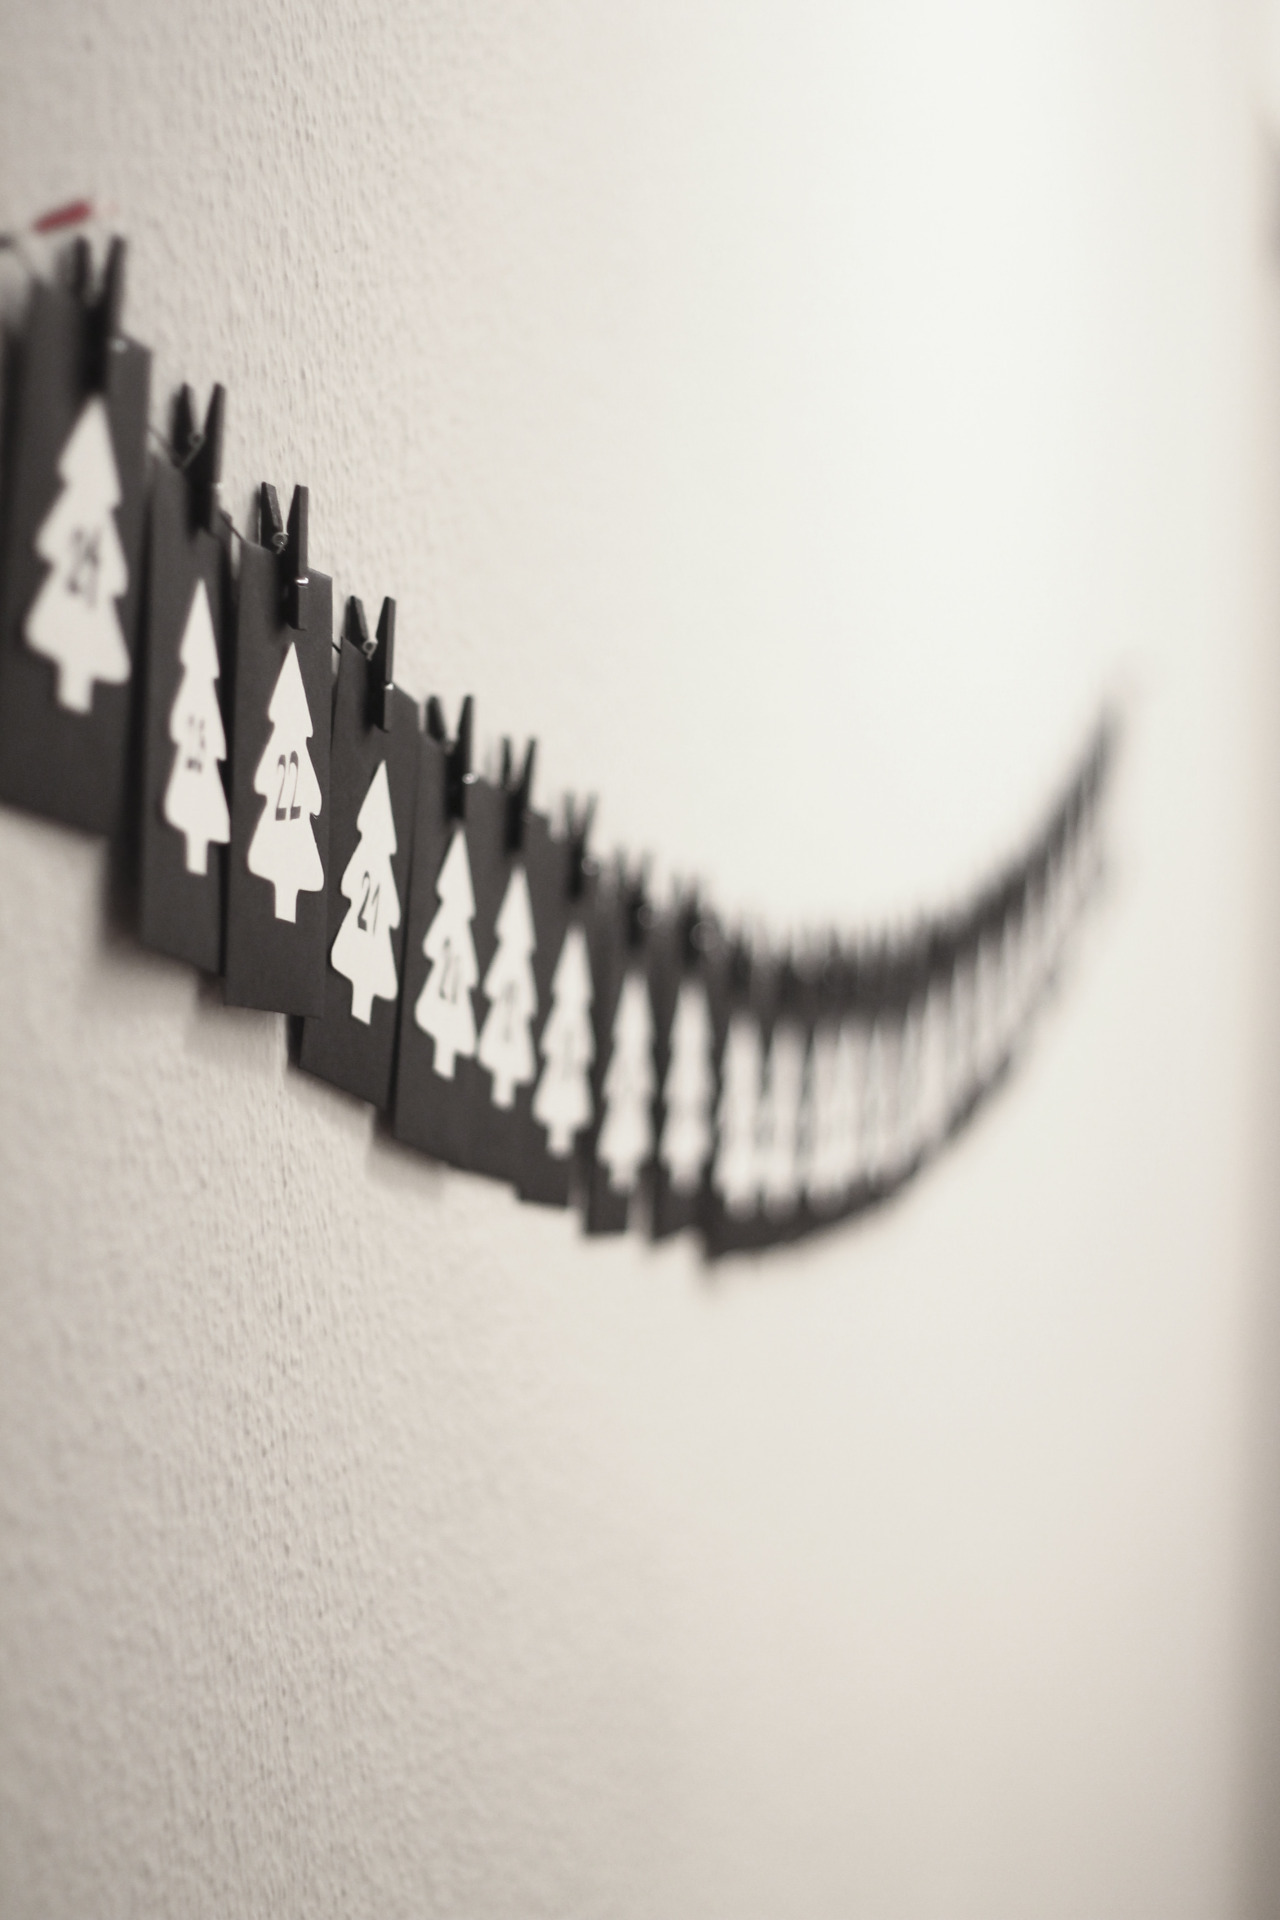
draw a christmas tree on a thicker piece of paper and use this as a template. copy the shape to the white paper and cut 24 trees.

step two
write 24 ideas on the black cards using a silver pen

step three
mark the numbers 1 to 24 on the white christmas trees with a black pen

step four
glue the christmas trees to the black envelopes

step five

hang a black cord to a wall and place the cards with the pegs

THAT’S IT! as easy as ABC or 123, right?
happy advent season. xx

FacebooktwittermailFacebooktwittermail

I JUST BOUGHT 6 WHITE T-SHIRTS AT MIGROS FROM THE BRAND MIGROS BUDGET 3 FOR 14.90 CHF. A REAL BARGAIN 🙂 
I USE DARWI TEX-PAINT FOR FABRICS. WHEN I WAS AT THE SHOP I COULDNT DECIDE WHICH COLORS TO GET BECAUSE THERE WERE SOOO MANY NICE COLORS. I ENDED UP BUYING GOLD, BLUE TURQUOISE, BLUE ULTRAMARINE, LIGHT GREEN, MOOS GREEN AND LIGHT BROWN. I SAT DOWN AND TRIED TO DRAW A PEACOCK FEATHER WHICH IN FACT IS TOOO HARD FOR ME TO DRAW.. BUT IT TOOK ME SOME TIME TO FIND IT OUT. 🙂 THE TEX-PAINT IS REALLY EASY TO USE AND CAN BE FIX BY IRONING 5 MIN. ANOTHER DIY AFTERNOON CAN BE STARTED. I LL POST THE DIY T-SHIRTS AS SOON AS THEY ARE READY. LETS SEE HOW THE SHIRTS WILL LOOK LIKE…

FacebooktwittermailFacebooktwittermail